
When working with Kubernetes, you would probably like to automate as many tasks as possible. Manual actions are rare and uploading data to your volumes isn’t best practise in many cases, but there are still many use cases where an SFTP-server is desired. Image a situation where your customers will upload files that will be processed by your containers. In this article, we will show you how to set up an FTP server with multiple user accounts and multiple upload-directories using Atmoz.
In this article, we use Rancher as the Kubernetes management panel to deploy and configure Atmoz. Instead, you can of course use kubectl or any other tool of your choice.
Setting up Atmoz SFTP server in Kubernetes
If you want to run a SFTP-server in Kubernetes, we recommend using the Atmoz Docker image. Atmoz is an easy to use SFTP-server that supports multiple user accounts, SSH-keys for authentication and offers the possibility to specify different upload paths for each user. The steps you will have to take in order to get a working SFTP-server with multiple user accounts:
- Prepare the configuration for Atmoz by defining a Configmap.
- Deploy Atmoz SFTP server, load the configmap thats holds all settings en connect your data volumes.
- Test your connection.
Prepare the configuration for Atmoz by defining a Configmap
Before you can deploy your SFTP server, you have to create a ConfigMap. Your configmap holds all information about the FTP-users and their data paths. To create a config map, follow the next steps:
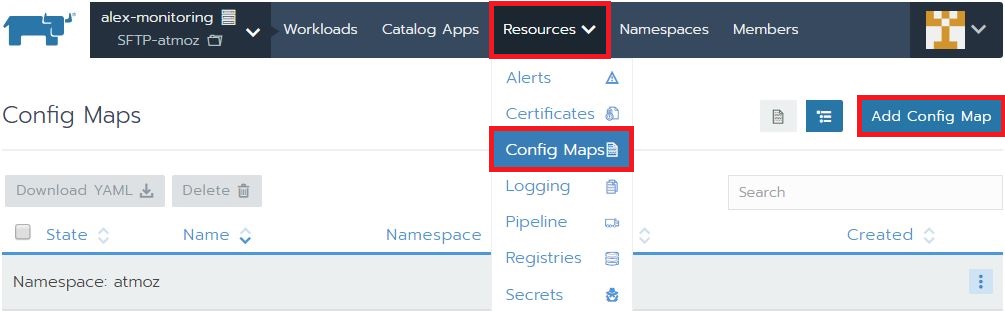
- Open the Rancher webinterface at https://rancher.cloudlets.io/login and log in using your credentials.
- Select your Kubernetes cluster and navigate to the project where you would like to install Atmoz.
- Navigate to Config Maps in the drop-down menu of Resources. In the screen that opens, select “Add Config Map”.
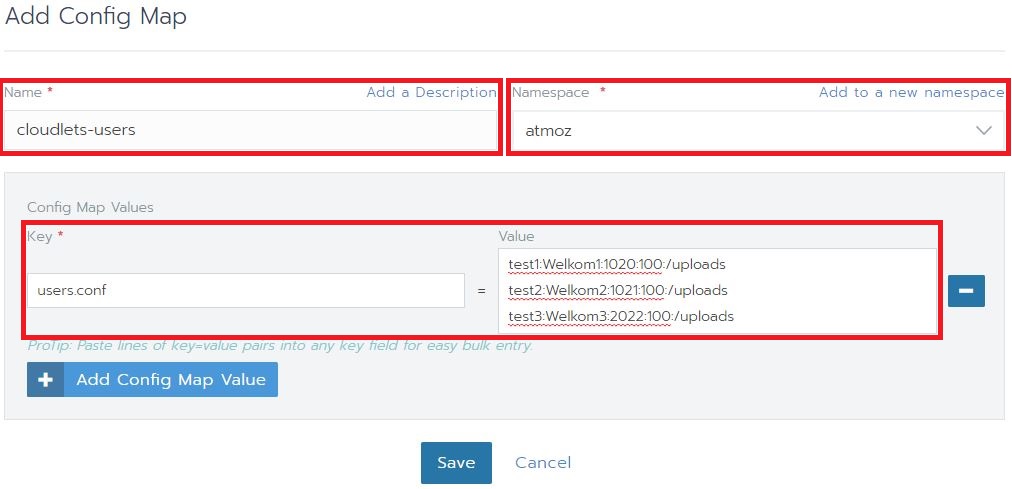
- Choose a name that helps you identify the config map in a later stage and select a namespace you will use to deploy your Atmoz FTP server. As the Key, enter “users.conf”. Under Value, you can specify your users and upload paths. The syntax for defining a user: <username>:<password>:<user ID>:<groep ID>:<path>,<optionally a second path>. Example:
Deploy your Atmoz SFTP-server and attach your configmap and upload volumes
In the previous step, you have created a Configmap that contains all necessary data for yout users. Now, we will deploy Atmoz and make it use the configmap.
- Go to Workloads and select Deploy.

- Enter the name you want to use for this Deploy. You can use the default Docker image atmoz/sftp. Select the namespace that also hold the ConfigMap.
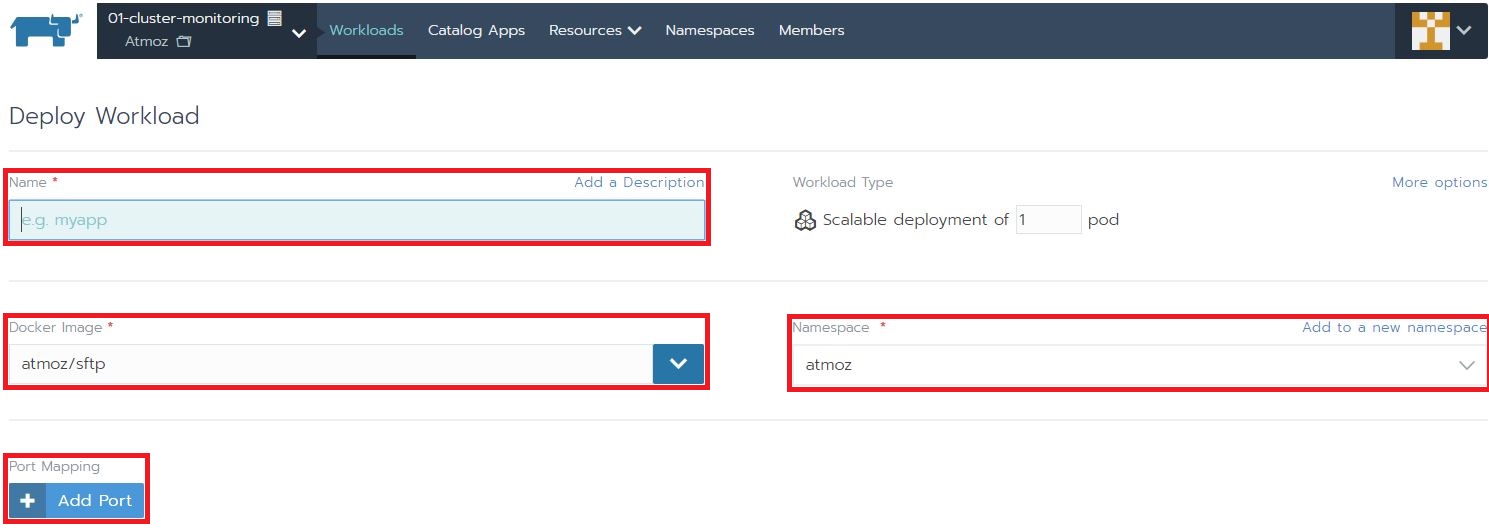 Finally select Add Port to let Kubernetes know the port the Atmoz is listening on within the container. The default port is 22. As the listening port, you can select a portnumber or just generate a random port. This is the port you will use to connect to your SFTP-server.

- Open the tab Volumes, Add Volume and select “Use a config map”.
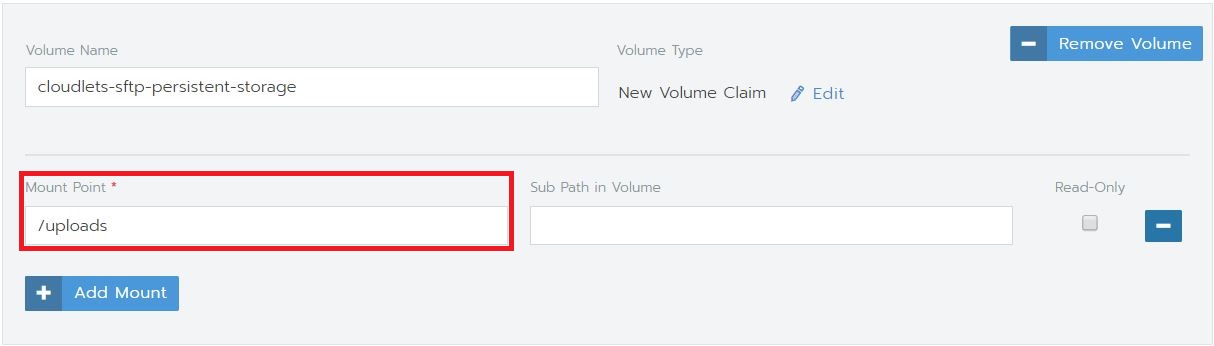
- Enter a Volume Name and as your Config Map Name, select the ConfigMap we have just created. As Mount Point, use “/etc/sftp”. This will create the file users.conf in /etc/sftp.

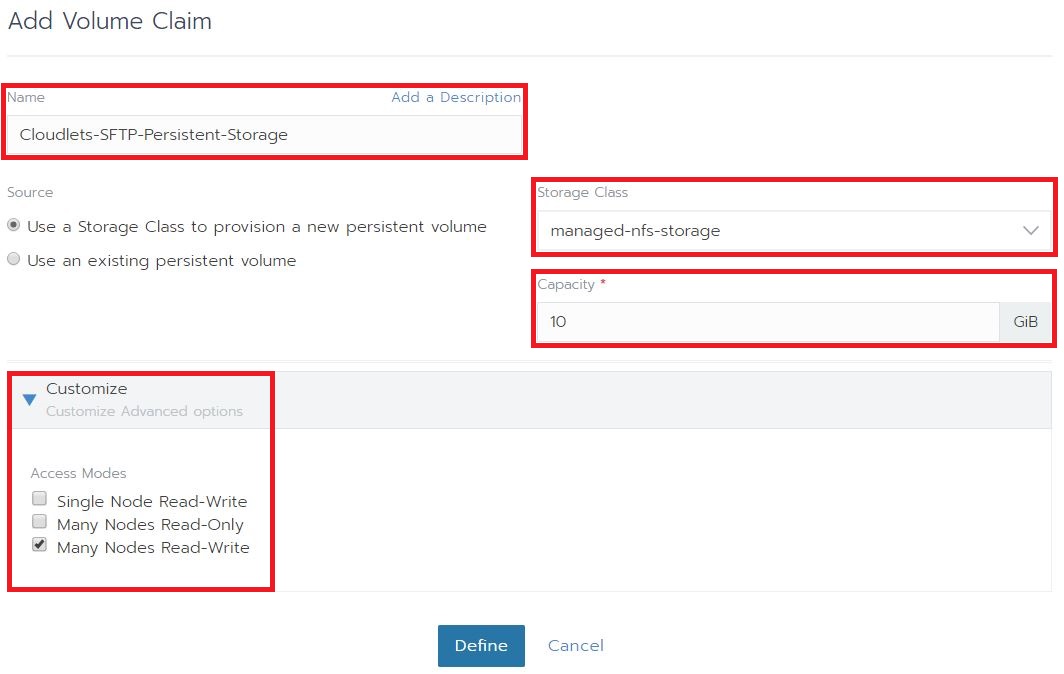
- The next step will be creating a persistent volume that will be used by your users. Using a persistent volume, makes sure your data survices a crash of your container or a reboot of your Kubernetes cluster nodes. Select Add Volume and click “Add a new persistent volume (claim)”. In the popup that opens, enter the name of the volume, select a storage class you will use, set the storage capacity of the volume and select the desired access mode. If you are using multiple pods that require write access to the same volume, you will probably need to set the Access Modes (in the Customize tab) to “Many Nodes Read-Write”. If your Kubernetes Cloud provider doesn’t support the Many Nodes Read-Write mode, you can setup a NFS fileserver.
- Finally, set the mount point where the persistent data is stored. This is the same path you have entered in your ConfigMap. Now you can Launch your SFTP server.
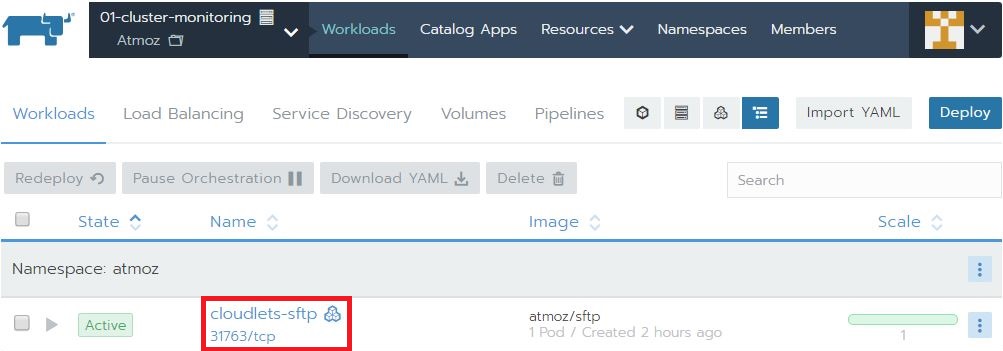
- When the SFTP server gas launched successfully, check the port that is used to externally expose the application. In this tutorial, a random port 31763 is used. This is the port you will use to connect to your SFTP server.
Test your connection
If all previous steps have been succesful, we can check the connection to your SFTP server. In this example, we will use FileZilla to establish an SFTP-connection.
- Open Filezilla.
- Enter the credentials needed to estabilish the connection. As the IP-address, you can use the external IP of your Kubernetes node. The username and password are specified in your ConfigMap.

- When you are connected, you will be able to upload/download your files.

Do you prefer connecting to port 22? You can configure an external Load Balancer or proxy to map the traffic to the right port. Kubernetes itself is not able to expose applications to port 22.
Do you need help configuring your Kubernetes SFTP server? Feel free to contact us. We are happy to help!